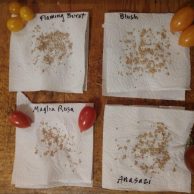
 SAVING YOUR TOMATO SEEDS
If you’re thinking about starting your own tomato plants from seed, you’ll be glad to know that it’s easy to save the seeds from heirlooms and other ‘open-pollinated’ tomatoes. One reason for this is that tomatoes are self-pollinating. This means that each flower is ‘perfect’, containing both male and female parts, and the arrangement of those parts is such that the female part (the stigma) is rarely exposed to the outside world before having been thoroughly ‘impregnated’ by the surrounding pollen-bearing anthers. Bees and other insects don’t really figure into the pollination of tomatoes. There are some older varieties derived from wild tomato that may be more vulnerable to cross-pollination, but don’t worry about that now. Do not bother to save seeds from hybrid varieties – only about 25% of them will resemble the plant from which you saved seeds.
WHAT YOU’LL NEED:
Clear cups, small jars or glasses
Small fine strainer
Paper towels
Adhesive tape
Permanent marking pen
Non-chlorinated water (filtered, spring, etc.)
- Choose the best, fully ripe tomato(es) from the most vigorous, disease-free, productive plants. Just to be on the safe side, choose fruits from the center of the plant where they are farthest away from other varieties. Do not save seeds from tomatoes you think might be disease-infected.
- Label a clear glass with a piece of tape with the variety name and the date.
- Cut a tomato horizontally across the middle. This exposes the seed cavities.
- Gently squeeze out the jelly-like substance that contains the seeds into the glass.
- Add an inch or two of non-chlorinated water and stir.
- Optional: Cover loosely with plastic wrap or waxed paper if you wish (if you are sensitive to mold spores, you may wish to include this step).
- Place on a warm (60–75 degrees F) shelf or counter where you won’t forget about it.
- Optional: stir once a day.
- Check after 3 or 4 days. A thin layer of whitish film (fungus) will have formed on the surface. It eats through the gelatinous coat surrounding each seed that inhibits germination. The fungus also produces antibodies that help control seed-borne diseases like bacterial spot and canker.
- Add warm water to the glass. Let the contents settle and begin carefully pouring off water along with pieces of pulp and any floating seeds (any seeds that float are immature and will not germinate). Repeat until the water being poured out is almost clear, with clean seeds resting at the bottom of the glass.
- Pour the seeds and water into a small, fine strainer (the spaces in the mesh must be smaller than your seeds).
- Tap the strainer to eliminate excess water, and invert the seeds onto a piece of folded paper towel. Try to spread the seeds into a single layer, but don’t fuss over it.
- Immediately label the paper towel with the name of the tomato variety.
- Allow the seeds to dry thoroughly- usually a day, sometimes more or less. Break up any clumps of seeds stuck to one another.
- Label a paper envelope with the variety name and the year, seal and store in a cool, dark, dry location. Some seed-savers like to keep seed envelopes in an air-tight container in the refrigerator.
- Tomato seeds should remain viable for at least 3 or 4 years when properly stored. Dryness is the most important factor.
